Thursday 28 March 2013

On Tenterhooks


Assorted shipments have arrived and so work on the saddle can resume. You may recall that I'm following the advice of Tim, who is an expert at this stuff. The first thing to do is to obtain half a cow. And not just any old half of a cow either. I don't actually need half a cow but this is the smallest amount I can obtain directly from the supplier and I'm sure it will get used. Tim gave his recommendations for the type of leather I needed and I was almost able to obtain what he advised. The important bit is that the leather is naturally tanned (with oak bark etc.) and is suitably thick. Chrome tanned leather (most leather is tanned with chromium salts) won't do at all, it won't move enough when stretched over the block and won't retain the new shape when dried. Also the part of the animal is important too. Tim advises using the butt rather than the shoulder as it will stretch less when complete and will be more durable. Also, as every female on the planet knows, the butt is thicker than the shoulder.

Half a cow, yesterday.

My hide was produced by Chahin tannery in Mexico, it is 6 mm skirting, Tim thinks that this is too thick and has suggested ways of thinning it. Since I have so much leather, I'm going to try at full thickness first and then do it again if it doesn't work well. It's all a new learning experience for me.

The orientation of the saddle on the hide is also important, it needs to run vertically, up the animals side rather than along it's back. This is again to prevent unwanted stretch.

Brooks saddles are moulded under high pressure as in this short film at (6:00).  Do make sure you watch part two as well. Obviously my shed doesn't run to such tooling so I need to do it manually.

The first thing to do is to make the wooden block that the leather will be moulded over. When I did this previously I used one large piece of timber and carved it out. I used a lump of oak just because I happened to have it lying around. This was hard work and I wouldn't recommend it. So this time I decided to laminate the block from planks of pine, this has a big advantage that I'll get to in a minute.

Cutting out the laminates.

First mark the outline on the planks and then jigsaw them out. I used a coping saw just because I'm a retro grouch and like doing stuff by hand. Actually, I can't easily get blades for my jigsaw, it being an older model bought in England many years ago and now residing in NZ.

Glue them all together and clamp it up for 24 hours.

Clean up the profile before doing any shaping. 
I found that large metal working bastard files were better than a wood rasp designed for the job.

Then start to shape the block to match the saddle cantle plate and nose piece. 

Most importantly the the block needs to be a shape that you think will be comfortable to sit on. After so many miles cycling, I happen to know reasonably well what that means for me. That shape is not a simple triangle with folded over edges. The sides of such saddles tend to dig in most painfully. This is where the laminated construction comes into it's own, the lamination lines make it easy to see when you have both sides the same.

Finally when you are happy with the shape, varnish the block to protect it from moisture. 
A Brooks B70 has deep side flaps so I made my block quite deep to allow for this.

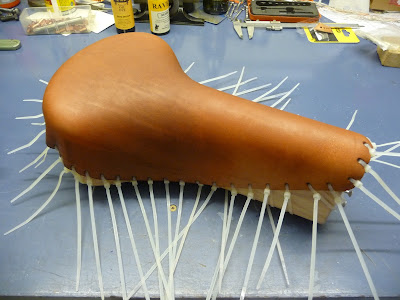
Now we need a way to stretch the leather over the block. When I did this previously I punched a series of holes around the perimeter of the leather and then threaded cord through the holes. By using a series of wedges I was able to tighten the cord. This wasn't very satisfactory and the tension in the cords wasn't easily adjusted. I hit upon the idea of using adjustable tenterhooks. Once again punch the series of holes around the circumference and then screw a series of wood screws around the base of the block. The leather can then be stretched by threading zip ties through each hole and around a screw head.

Tenterhook tensioning technique.

Next dunk the leather in some warm water. You will see air bubbles rising out of the edges and face of the leather, You need to keep it in the water until all the bubbles have stopped and then a bit longer for good measure. I left it in for an hour as Brooks do but that is probably overkill. When you take the leather out of the water it has a rubbery, gooey feel to it.

So now strap it down onto the block with the zip ties, it is possible to massage the leather down to conform to the shape of the block and then tighten the zip ties to hold it in place. Due to the thickness of the hide and the three dimensional nature of my block this is not a quick process and it is quite hard to completely remove the bulge on the top of the saddle. It would probably be easier with two people. One to massage the leather down the sides and the other to tighten the straps at the same time.

I'm going to buy shares in a zip tie company.

This whole process took me an hour and a half from getting the leather out of the water to having the leather tightly conforming to the block. Tim has recommended a specific type of dye to use when the leather is still wet, so the next step is to make a dauber (I made it earlier from cotton wool wrapped in cotton cloth) and give the saddle a number of coats until the desired colour is achieved. Then leave it to dry.

So far so good, but now the skilled bit starts.

To be continued...

<out of character rant>

In other news, we have had two cyclists killed this week in Christchurch. My thoughts are with both families, really they are. In recent months I've started to notice a worrying tendency for the press to report on the clothing choices that dead cyclists make. In both cases the cyclists were wearing helmets which is a legal requirement here in NZ, this was duly reported. Also noted was the fact that the cyclists were not wearing high visibility clothing. It appears to be a subtle shift in the blame process. Note that both collisions, I won't call them accidents, were in bright daylight in dry conditions and within 1 km of each other. The cyclists are effectively being partially blamed for being killed by not dressing like a Christmas tree. Do all cars have to be painted bright orange? Is the colour of cars involved in collisions noted in the press? With all the post earthquake roadworks, demolition and building going on in Christchurch, at least half of the population of the city and most of the road network are swathed in bright orange traffic cones and high visibility jackets. This has become the new normal and consequently a cyclist does not stand out anymore.

New Zealand driving standards are very poor when compared with developed countries. Factor in the national sport of drink driving and you arrive at the shameful road toll that we have. Until people start to drive with some awareness and empathy, things will not improve.

I'm not holding my breath.

</out of character rant>
Tuesday 19 March 2013

The Sun Goes on a Diet


I'm waiting for some supplies to arrive before I can continue with the saddle. When you live in New Zealand this can mean a reasonably long wait if the stuff is coming from overseas. When local suppliers tell you that it's coming on the next shipment, that's generally exactly what it means. In the meantime I've spent my time putting the sun on a crash diet. If you recall from almost a year ago (now where did that go?) I'd had the teeth cut into my blanks but then I'd put the gears to one side to concentrate on other stuff. Other stuff has been done so it's time to look at the sun again.

I need to make holes in the sun to make it appear the same as the original, the gear features five spokes, one of which carries Renouf's patent wedge to secure it to the axle. I decided that the best approach would be to accurately drill holes at the corners of the cutouts and then drill extra holes around the perimeter to allow the bulk to be quickly removed.

First make an accurate arbor so that the gear can be easily mounted in a chuck. I work near a railway line and routinely pick these up as they are discarded.

Discarded 1" railway bolt.

They are made from a very high tensile steel and machine reasonably well. Very useful for throwaway stuff like temporary arbors.

The location of only four of the corner holes needs to be carefully marked, the rest can be divided.

Sun spots?

Then make Swiss cheese of the centres...

...and use a junior hacksaw to join up the dots. This removes a lot of material quickly.

The inner and outer arcs can be milled using the side of the cutter. 

I would have preferred to use a rotary table to do this but I didn't for a very good reason. I haven't got one. The Myford dividing head worked OK though as it has a 60:1 worm which means slow feeds are possible. I did try to buy a rotary table about a year ago and everything that was available to me was junk or made from cheese so I didn't.

Then get busy with a file. 

I may have mentioned this before, but I really enjoy hand filing. I'm not sure what that says about me, I'll let you decide <cough> OCD </cough>

At this point the sun gear looks similar to the original but there are still many details to put right.


First file the front of the outer rim to be a curved profile. 
This completes the front side of the gear.

Flip it over and machine a recess into the back of the gear, 
I should probably have done this before I cut the holes.

Then file the inner rim to the same curved profile as the outer,
also blend the transition from the central boss to the spokes.

Next I have to profile the rear side of the spokes to match the original.


I bought a few ball nose slot drills a while ago for exactly this job, after a little testing on some scrap I was able to work out the speed and feed rates to avoid chatter.

Bolt the gear down directly to the mill table and align it with the spoke square to the bed. Then machine the recess in either side of the spoke.  It's not possible to get the profile correct at the rim end of the spoke using the mill but a few minutes with a small carbide burr in the Dremel soon cleaned up the blend.

Notice the complete lack of clearance and visibility.

All that needs to be done now is to polish, harden and plate which I'll do later when I have more parts ready. For the record, the weight has almost been cut in half by the diet, from 1lb 8.25oz (~0.69kg) down to 12.75oz (~0.36kg)


I'm quite surprised by the slender cross section of the spokes in the original gear casting. I'm unsure of the material it is cast from but clearly it is strong enough to handle the torque involved. My spokes are marginally thicker and certainly stronger being made from 4140 chromoly. Consider the size, material & thickness of your average mountain bike granny gear and then consider the torque as you stand on the pedals in first gear and winch yourself up your local mountain. You do have a local mountain don't you? If you don't, we have lots in NZ that you can borrow.

In other news, I've been off the bike for the last two weeks with a very serious case of manflu. I rode into work again this week for the first time in 2 1/2 weeks. A 70km round trip is probably not the best way to get back into regular riding and I suffered like a dog. Getting old is wildly overrated, the only tangible benefit that I can see is I get better at cryptic crosswords.

The nights are drawing in faster now as we approach the steep part of the seasonal sin wave and the early mornings are noticeably colder. I like riding in autumn though, there is less wind and the days are usually warm.


Sunday 3 March 2013

Plating EQC Frames


I have a very good excuse you know.

I mean for not posting an entry for such a long time. The house has been repaired from the earthquake damage and we have been forced to take refuge in a B&B for the last month. B&Bs are OK for a few days at most, after a few weeks they become tiresome and after a month, positively ghastly. We turned the house over to the builders and my lovely wife (resident soft furnishings expert) chose new paint and wallpaper. We got lucky, our builder was excellent, indeed he is worth a mention. David Peach of North Canterbury Renovations did an excellent job, it's just unfortunate that the rest of the house looks a little shabby now. But I digress.

The B&B was at just the wrong distance from the house, it meant evening visits to The Shed were awkward at best and consequently I have made little progress. As promised, I have made a new seat post mount (at the correct angle this time) from a slightly thicker strap of steel. I wasn't happy with the old one but this one is good, much stronger. Also I've plated all of the saddle components which means the saddle is now ready for a leather top.

 If I've counted correctly, there are 48 individual pieces that have all had 
to be hand made in the saddle frame, no wonder it's taken me this long.

I plated the parts over three consecutive nights. I did the rails last and 
needed to borrow a Lego storage box from my son to get the length I needed.

Ready for a good leathering.

I was asked last time if I am going to make one or get one from Longhorn Leather here in Christchurch. This is a good question not easily answered. I can dismiss the Longhorn option immediately, not through bad workmanship, they are very good, but because I find their saddle tops too two dimensional for my arse. I've ridden a few 90km days on one of their tops and it just didn't fit my backside very well. A long time ago a friend of mine offered to make my leather top, so he could contribute to the project. Tim's work is first rate and at the time I happily agreed. Now though, after 20 months of this business, I'm of a mind to make it myself. I've done a lot of leather work in the past and even a few saddles. It also means I won't lose my precious frame in the post, a problem that unfortunately I have recent experience of. Tim is acting as my mentor for this stage, more later.

In other news, I had a disaster whilst we were out of the house. I have a pair of lovely wood rimmed wheels (28 x 1 3/8") or 700A, ETRTO 37-642. These have sat in my lounge for ages waiting for a suitably ancient frame to turn up. When we had to clear out I noticed that the rear tyre was soft so put 30psi in to maintain the shape and moved it into the garage. The next time I saw it, it looked like this:

Oops (and other, stronger words).

I will mend it but probably won't be able to ride it again. The sad thing is, I now have a frame that would suit these very well.

Also this week, two other projects are nearing completion. The fruit of Young Dylan's labour was brought round to my shed this week to get all the threads and bearing surfaces cut or cleaned up. I have one of these you see.
You are welcome to have use of it but it doesn't leave my shed.

I'm more than happy to prep frames for other people at no charge if they bribe me with sweeties, biscuits or beer. He's done a great job and I look forward to his report of the first commute on it. Not bad for a tyro ;-)

Tweed Pete has also brought his newly complete MkII round to my shed for the same purpose, this features 4130 chromoly tubing which Pete has TIGed together himself. Pete has also thrown some old parts on it so he can ride it tirelessly up and down his road with a big grin on his face. I can imagine his neighbours children commenting "Mum, that special man's riding his bike again". I'm not yet allowed to post a picture. It will be making it's debut once fully complete.

Sadly, both Pete and Dylan are unnecessarily tall and consequently I'll be unable to ride either one properly.