Showing posts with label Filing. Show all posts

Wednesday, 15 February 2012

Bearing Adjustment Locks

Cleaned up silver soldered joints, the head will be plated later
and these require a little more work.

I've not had a huge amount of shed time this week although I have been able to clean up the brazed joints and make the little locking tabs for the bearing adjustment. These locate in grooves milled into the upper fork legs at the appropriate angle and width.

The depth is not super critical but I didn't want to
break through the tube wall so I had to be careful here.

The brazed joints all cleaned up easily but doing so showed up a slight movement in the non gear side bearing housing. This has clearly happened as a result of the heat, the housing are now not quite parallel. The discrepancy is very slight and doesn't seem to affect the bearing (I built it up to check) which is good because the chances of cold setting the 4130 forks is effectively nil, they are very strong.

I also drilled and tapped the holes for the oiler and inner bearing race locking grub screw (2BA & 4BA respectively). On the original these holes were very close. too close I thought so I cross referenced with some pictures I took of the racer in the Coventry Transport Museum. This famous machine has the oiler hole located much higher up and away from the grub screw, I have done the same and based mine upon the Percy Nix bike in Coventry.

The original facile I am copying has very close
holes for the oiler and inner race grub screw.

The holes on Percy Nix's racing machine are farther apart.

I've based mine upon the Coventry machine.

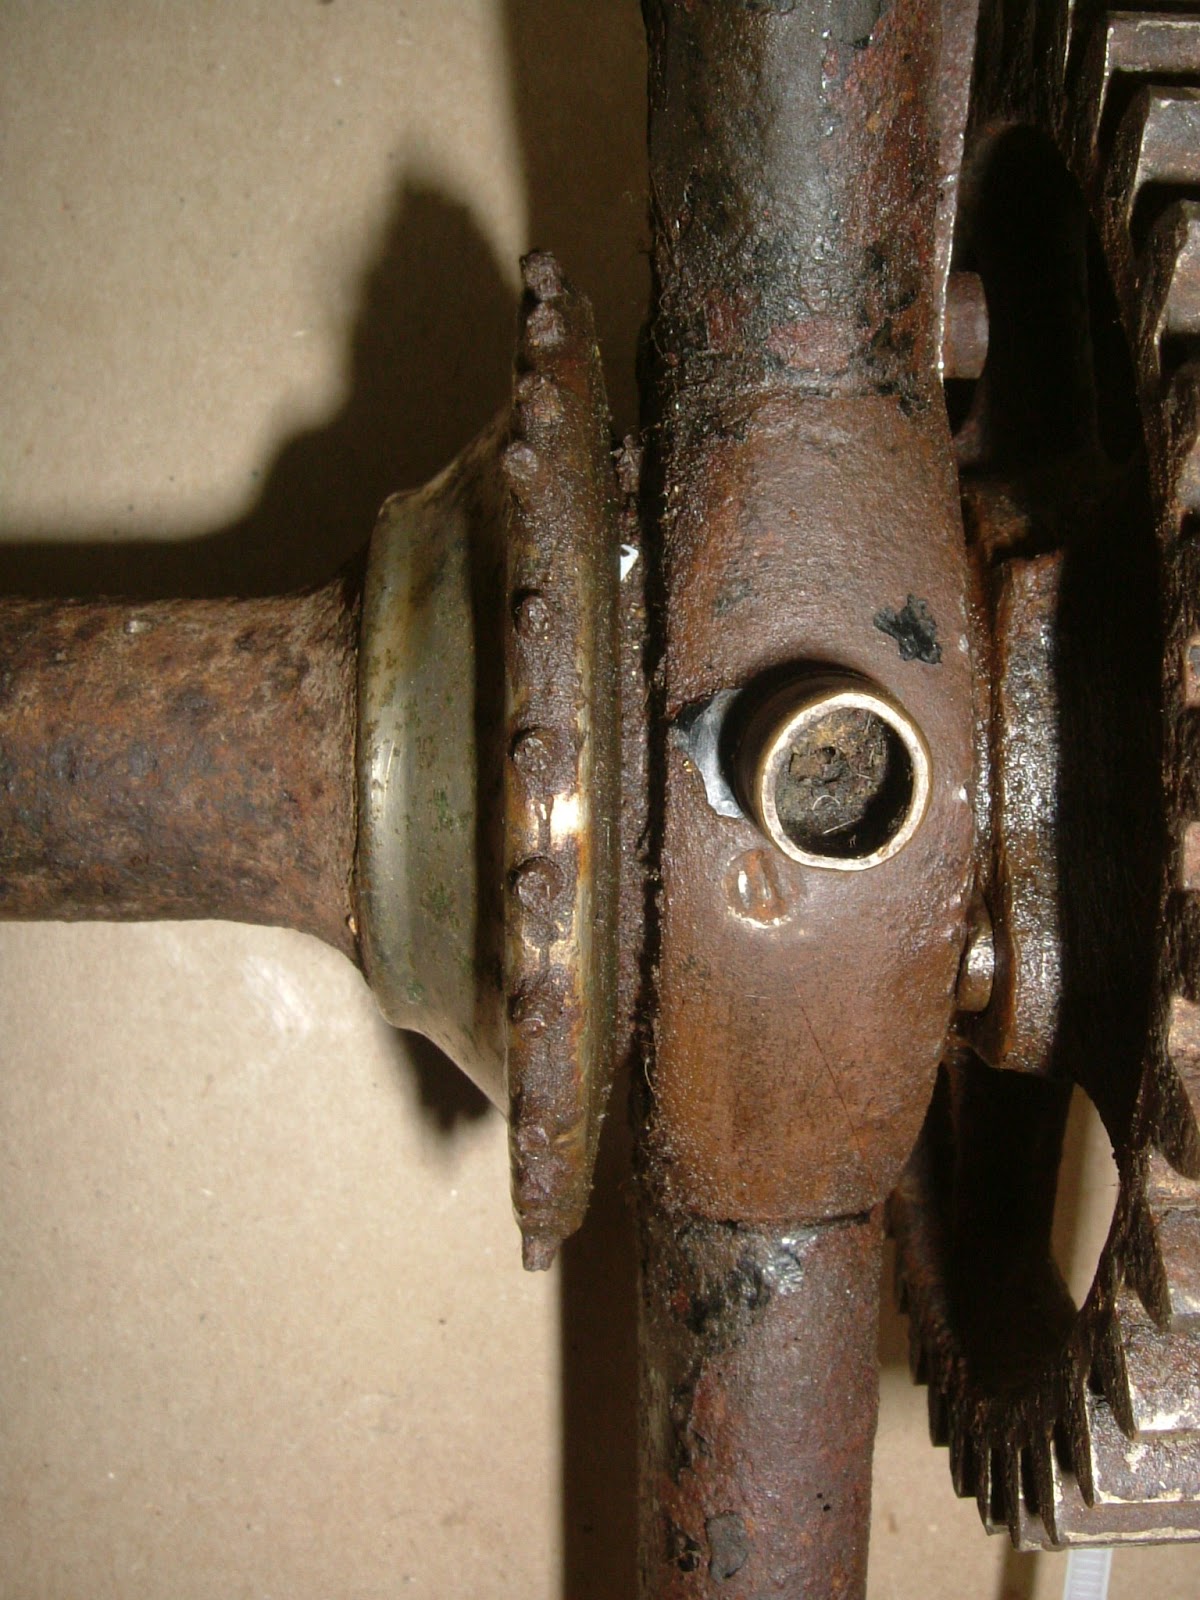
A good view of the grub screw and the oiler in place. 
The Coventry bike is missing it's oilers, this oiler is missing it's cover.

The locking tabs are asymmetric in that the one on the gear side is longer than the non gear side, this is so that the bearing can still be adjusted with out removing the gear from the hub. I did consider machining them but decided that the set up would take longer than careful hand filing.

They're tricky little things, the inner edge is a curved 45 degree bevel 
and then two notched are filed into this to produce three teeth 
to lock into the castellations on the outer bearing race.

My stock of 4BA cheese head screws is a little low, 
hence the rusty one used in the picture.
 BA screws are all but unobtainable for sensible money in NZ 
so I'll either make or import some myself.

Next week I'll hack into a large chunk of Gunmetal (LG2 bronze) and start the spoke flanges for both wheels. Gunmetal machines beautifully so I'm really looking forward to this.

In other news my parents, both keen gardeners, have been busy in our garden. When we moved in many years ago we found an old greenhouse hidden in one corner of the garden. My parents have now dismantled this to allow us to move the compost bin to somewhere where it may actually work. My father has about a dozen greenhouses himself but I'm unsure how he's going to fit mine into his suitcase when he leaves. I'm sure he'll try.

An amusing incident happened at dinner the other night, the children were running through all the languages that they knew how to say hello in. After the obvious English, French, German, Spanish, Maori & Japanese, my daughter upped the ante with Gaelic. "Pogue Mahone" she proudly said. I nearly spat my tea all over the table, having shared a house with a native Gaelic speaker at University I happened to know what this very useful phrase actually means. I suspect that an unknown Irishman has been having a little fun at the expense of my Daughters teacher. Apparently the class all solemnly repeat the phrase in that special monotone that children the world over reserve for "Good Morning Teacher". My daughter was very embarrassed when I told her what it meant, whilst my son was busy writing it down. My parents were not amused in that very Victorian manner.

Wednesday, 23 November 2011

An Act of Dog

This week has been momentous in that I now have the first assembly complete. I've finished off the head to the point where I can fit the forks legs to the head, the knees to the fork legs and the lower legs to the knees. Everything jiggles nicely with no stress to hold it all in place, so hopefully when it is brazed up it will stay where it should without too much distortion and misalignment from the heat.

The'axle' is just a machined spacer to hold everything square and concentric
However let's not run before we can walk. There has been a lot of hand work this week underneath the head to clean it all up. As before here is a series of photos when I remembered to take some.


The mounting point for the front brake pivot has also been machined, this required some careful trig. to calculate the angle and depth to ensure that the hole didn't break through either below the head or into the central bore.

I've tapped it at 1/4" bsf, I wanted to use 1/4" bsc but I didn't have a plug tap in that size.
I've rootled around in my magic cupboard to find my stash of silver solder and failed miserably. I suspect that my wife has been funding her extravagant lifestyle by discreetly selling it on the local black market. Or I probably just used it already. I did find lots of skinny silicon bronze brazing rods though, so maybe I'll just use that to glue it all together instead. I'm undecided if I'm going to finish the lever pivots before I braze it all up or if I braze up what I have completed already. What do you think?

My workshop and lathe need a major spring clean after all this work on the head. Recall the original billet I started with that weighed 18lb 3.5oz (8.26kg). The machined head now weighs a svelte 2lb 1oz (0.93kg), so I have 16lb 2.5oz (7.33kg) of swarf and filings lying around (mostly in one pile). My wife is getting grumpy when I bring it into the house on my feet so clearly a clean up is needed in order to maintain certain marital benefits.

Next week I'll finish off the casting patterns and then decide what to work on next.

In other news, a few of us rode the Little River Rail Trail at the weekend, We rode from Motukarara to Little River, had a picnic lunch and then rode home again.

Motukarara
'04 & '06 Royal Enfields. The wagon has a wooden chassis and  is older by 25 years.
Little River station building
It was a beautiful day that turned into a roasting Nor'Wester. On the way back, we were riding straight into the teeth of the gale (of course). The kids did really well and both rode the full 45km, the longest ride for both of them. Less fortunate was another youngster that hit a rock next to Lake Forsyth, wobbled and then plummeted 5 metres down a rocky bank and into the green, algae filled water. She disappeared from sight underwater, all tangled up in her bike, but quickly resurfaced. Fortunately we witnessed her disappear so were on scene very quickly and I was able to scramble down the rocks and jump in to assist her out of the toxic soup, She was miraculously unhurt other than bruising, just very scared and shaken. Her bike was badly damaged but she had clung on to it in the deep water and I was able to fish it out. I've since heard that she is all OK which is wonderful news. I confess to having a wee drink that night, I'm not a great swimmer.

In more other news, I've taken another tumble off my bike, the second in 10 days. Commuting home through a park in Christchurch, I was JRA and about to overtake a pair of elderly ladies walking their dog. I'd pulled well of the tarmac path and onto the grass so I would pass without scaring them. As I'm level with them, their dog very suddenly turns sharp left and runs straight under my front wheel. Fortunately, I landed on the same side as last week so I just freshened up my existing gravel rash and re-wrenched my back in the same spot. The ladies were very apologetic and concerned but after I'd been able to get up and straighten the bars etc. I pointed out that it wasn't really any one's fault and there was no real harm done. It was just one of those things, an act of Dog.

Wednesday, 9 November 2011

The Neck Hole - head part 4

For various reasons I've not had much shed time this week although I have managed to nip in every now and again. Enough to make the hole in the back of the head for the neck to insert. Compared to the earlier Stanley type head with plain cones, the cutout appears to be much wider. This is because it is. The extra width is to allow the bearings to be inserted. On an Abingdon ball head the bearings are attached to the neck and the whole assembly inserted and locked into the head. This assembly is 1" wide so the width of the cutout has to be a corresponding width plus clearance.

This illustration is from 1887, a year after the patent
I had originally intended to drill out the bulk of the material and then mill the edges clean. In the end I just milled the whole hole, this proved to be the easy part.

It's hard not to mill away part of the threaded rod securing the head to the  vertical slide
Since the mill couldn't remove all the material in the lower corners, I needed to file these to shape. This proved quite time consuming since I had less than half an inch travel on the file tip only. These lower corners are also slightly flared to provide a smooth edge for the neck on full lock (the head is tapered and the neck only contacts at the bottom edge).

The original

My copy. I was pleased that the counter bore has come out really well,
this is the first time that I've been able to see it.
The observant reader will notice a difference between the head of the original machine I am copying and the head I have made. The original is a rare pneumatic model, that was made for 1 3/4" Boothroyd or Dunlop tyres. (I need to do some more research on this). Clearly these new fangled pneumatic tyres are significantly wider than the older solid tyres they usurped. This meant that a new head casting was needed. No need to produce a new neck casting though if a relief is made at the back of the new head to mimic the dimensions of the original size. This is what the curious shaped cutout is for, it allows the original shaped neck to be retained with no modification. Notice in the illustration above how closely the neck follows the head casting at this area. I have only personally seen one such pneumatic geared facile although I know of one other. My geared facile will have 3/4" solid tyres so I am using the dimensions of the solid tyre head rather than the pneumatic head. I suppose I could make some 40" pneumatic tyres but with my shed time as limited as it is, I'll go with solids.


In late 1891, Ellis & Co. and the Crypto Cycle Co. merged under I.W.Boothroyd as Managing Director. Boothroyd was a firm proponent of front drivers and continued to manufacture various models of crypto cycles right up to the late 1890's. Interestingly, the Boothroyd patent tyre was the design that became universal in the USA (single tube) after being promoted by Col. Albert Pope whilst the English preferred the infinitely superior separable inner tube designs (of which there were many). By this time the company was only offering cushion tyres (1" or 1 1/4") or pneumatics, solid tyres were all but gone. This table illustrates the rapid rise in popularity of the pneumatic tyre at this time.

Cycling by H H Griffin, revised second edition 1893.
As with all pictures, click for a larger image
In other news, we have much sadness in the house now that the grandparents have gone home. We all went mountain biking at McLeans Island  to cheer us up. My daughter flying off and leaving us in her dust. I was on a tandem with my son and and we couldn't keep up. Obviously due to the lack of manoeuvrability and extra inertia, obviously. Just last week she won every event in her school sports day except for the discus. She is built like a racing snake though. One day she'll be faster than me on a road bike. I'll think I'll probably take up golf at that point. My in-laws have left their golf bats in the garage for me to look after, have they recognised this already?

Thursday, 3 November 2011

Handling the bars - Part 3

It's curious, is it not, that we refer to 'a pair of handlebars' to describe a bent piece of tubing. Where does this term come from? The answer of course is way back, as with all things bicycle related. Here is a photo of a pair of handle bars. They are detachable and each side is separate from it's twin. On the end of each is a handle. They are also solid, not hollow. They are bars, a pair of handle bars.

This particular example is an 1883 Bayliss, Thomas & Co. DEHF
(Duplex Excelsior Hollow Fork) although many other manufactures had similar arrangements
However, by the time that Ellis & Co. were making the geared faciles, hollow handlebars were the norm. A solid bar of the same OD as a tube (same material) will resist bending better, however a tube of the same weight (cross sectional area) as the bar will resist bending even betterer. The obvious result is that handlebars became hollow with a larger outer diameter and a thinner wall thickness. (A trend that continues to this day with the 'new' standard of 31.75mm - 1.25"). The geared facile has handlebars 27" wide that taper from 0.75" in the centre. So I need to replicate the handle bar mount with a 0.75" bore + clearance for braze.

The first job is to remove all the unnecessary material from around the head. The easy way is to drill a series of holes and then saw between them. I've found that the best way is to start with small holes and gradually increase, otherwise the drill bits can wander into a neighbouring hole. I've struggled to buy decent junior hacksaw blades for years. All the recent ones appear to be made of cheese and bend all too easily. But I digress.
Do you know what a versine is?
An easy way to remove excess
With all the excess removed I can now focus on shaping the handlebar mount into a nicely rounded shape. Strangely, I find it easier to get an accurate circle if I start with a square and attack a corner at a time. I'm going to mill/flycut the square shape and hand file the round shape. Pictures can describe the various steps better than I can.


My father taught me how to use a file many years ago. While an apprentice he was assigned an exercise to make an hexagonal hole in a piece of (unknown thickness) gauge plate and then make a hexagon to fit it accurately in all 12 orientations. All by hand using a file only. Apparently his was the only one that did, such is my upbringing.

The last two stages are to bore the 0.755" hole and then radius the edges of the mount.

Yet another boring photo, this time a boring head,
See if you can spot the mistake. Cross, me? not half.
Next week I'll cut the recess into the back of the head where the neck will insert.

In other news, on Saturday a few of us travelled to Akaroa with our bikes to take part in their french festival . Saturday was a beautiful day with high temperatures, no wind and not a cloud in the sky. The event was extremely enjoyable and we didn't leave until late in the afternoon.

In other other news, I've been given permission to buy a new pair of cycling shoes. This is indeed a momentous occasion since the last ones of I bought were a pair of Sidi Genius 2 in 1994. At the time they were the top of the line road shoes and mine are just about completely knackered after 17 years and more than 150,000 kms. Being a cheap retro grouch, I've been reluctant to replace them with any of the modern disco slippers. However, my very kind wife reminded me that I have a birthday in a couple of weeks and she never knows what to buy me... I've ordered a pair of Sidi Ergo 2 in bright shiny red (to match the bicycles). This pair should just about see me out...

Wednesday, 21 September 2011

Filing

I have sore fingers. Since I spend many hours at a keyboard this has made the working day even more fun than usual. Most of my shed time this week has been spent making powdered steel. I don't actually want the stuff, it's just an inevitable by product of shaping metal. I also made a lot of swarf, I don't want that either.

The first job was to make the upper and lower legs fit nicely onto the knees. With the tangs milled to width and depth it simply meant carefully filing the stubs to the correct elliptical profile. As the correct size and shape is approached it is important to go carefully as it is quite difficult to file metal back on again. The fit needs to be reasonably snug so that the braze will get sucked up into the gap by capillary action. The upper legs were easier than the lower legs since the lower legs are tapered. One of the upper legs has a very slight twist from the rolling process described earlier, this is only a few degrees and by filing the tang to compensate, I've been able to remove the error at the top end of the tube. The result is not noticeable and will mean the head will be easier to make when I get to that part.

I treated myself to two new files this week.
Fitting the tubes
The next job is to smooth the transition between the tubes and the bearing. This is the fun part as time spent here will pay dividends in the overall appearance of the finished machine. I'm aiming for an authentic reproduction and I don't want anything to look out of place.

Rough cuts, note the tube off cuts protecting the tangs
Smoothing cuts
A lovely pair of knees. The channel in the side of the
lower tang is to allow the inner weld bead to remain intact.
Still to do is to hollow out the ends of the tangs for about half of their depth. This has several advantages other than the obvious weight loss. Firstly it will make the braze up easier as the braze will be able to flow to the extreme end of the joint more easily without having to over heat the tube. Secondly and more importantly, it removes a stress riser at the end of the tang. This was well understood back in the day, early bikes tend to have a solid stub brazed into tubes, whereas later bikes have a hole bored into it and the latest examples have feathered edges. The most obvious joint where this is a problem is where the neck casting is brazed into the backbone. Paul N. Hasluck describes the problem and the cure in 1897. This evolution can also be clearly seen in contemporary drawings.

Cycle Building and Repairing - Paul N Hasluck 1st Ed. 1897
Click for a readable view
I have experienced this issue myself when I cracked one of the fork blades on my racing penny half way around the 'Cambridge 50' some years ago. The crack was right at the end of the tang on the sharp V edge of the fork blade. Interestingly, It also demonstrated to me how squirrely that particular bike is (22bwg tubing) since I only noticed when the crack had propagated fully half way through the width of the blade. Fun to ride though.

I had to walk 15 miles because I failed to spot this early enough
With all the filing complete, I can do a trial fit up. I've made another of the male threaded blanks with the same recess and also machined off square a tube that is a snug fit into these recesses. By installing a blank in each knee and bolting up with the tube in the recesses I can ensure that both knees are spaced at the correct distance, parallel and concentric to each other.

Holes for the oilers and inner bearing locking grub screws will be drilled after brazing
The top ends of the upper legs are spaced at the correct distance for the head. The lower legs are correctly spaced but are slightly out of line with each other, probably only by 1 degree, but I'm a pedant and I'll need to correct that with some more careful filing. I won't braze anything up until I have the head machined since I'll probably need the jiggle factor of all the joints to get everything in the right places.

In other news, I managed a short ride at the weekend. Sunday was a fantastic day, so I borrowed my wife's recently completed Royal Enfield (with permission) and took the kids on a gentle 22km potter around the Canterbury Plains, we had plenty of breaks and snack stops to keep the kids and my backside happy. The Enfield was the perfect machine for the experiment and I'm pleased to report it went very well. I'll try and ease back into regular cycling over the next couple of weeks or so. You have no idea how good it felt to be back in the saddle.

I've had a request for a photo of my wife's shoes.

Red ones, naturally
She bought some more at the weekend too, she doesn't know that I've found them yet but that's OK because I've hidden a new bench grinder behind the door in the workshop.